Pages

Tuesday, April 8, 2014

Target platforms: Any CPU vs x86 vs x64

A lot of developers misinterpret the meaning of "Target platform" option in Visual Studio. You can read a good explanation here. I don't want to take credit for others work, so I just summarize the 5 most important facts:
  • "Any CPU, means that the assembly will run natively on the CPU is it currently running on.", however "Any CPU does not guarantee that it will run on both 32-bit and 64-bit Windows." (if it has 32-bit dependencies, but not marked - author)
  • "[...] this setting actually does not affect the build of the assembly in any way except to set the platform status information on the assembly’s CLR header."
  • "Reasons to set your project as x86 include dependencies upon native DLLs that are only available in 32-bit"
  • "[...] assemblies marked for x86 can still run on 64-bit Windows."
  • "All assemblies targeting .Net 1.0 and 1.1 will be 32-bit only (x86) [...]"
Don't forget to read the whole article to have a better understanding :)


Monday, April 7, 2014

The differece between "new" and "override"

However the keyword new and the keyword override are very alike, they have some really different purpose and it is not recommended to swap / mix them. You can read their behaviors and purposes e.g. on StackOverflow

Here is an example for the article above. As you can see, you will have different result, which can cause you some headache if you try to find a bug.

   public class Base
   {
      public virtual void Method()
      {
         Debug.WriteLine("Base");
      }
   }

   public class Override : Base
   {
      public override void Method()
      {
         Debug.WriteLine("Override");
      }
   }

   public class New : Base 
   {
      public new void Method()
      {
         Debug.WriteLine("New");
      }
   }

   public class Program
   {
      public Program()
      {
         var b = new Base();
         b.Method(); // "Base"

         b = new Override();
         b.Method(); // "Override"
         
         b = new New();
         b.Method(); // "Base"
      }

      static void Main(string[] args)
      {
         var p = new Program();
      }
   }

Unfortunately C# compiler has a really bad behavior and let you to hide a method without explicitly write new. Ohh, yeah... you will get a warning, but not a compile error nor a runtime error. All you are going to face with, is some unwanted misbehavior. So, watch out.

Monday, March 10, 2014

ReactiveUI extension for WPF

My very first article got published in the Dot-Net-Pro magazine last week under the title "Haben Sie schon reagiert?". It is about a new WPF extension: ReactiveUI, which lets you to develop event based, always responding and up to date UI in WPF. You don't need to worry about INotifyPropertyChanged, BackgroundWorker or CommandManager anymore. 

The greatest thanks go to my colleague, Hendrik Lösch, for his support.

Wednesday, March 5, 2014

Windows 7 WPF style on Windows XP / 8 / 8.1

The issue


If you have a few years experience, than you already faced with the issue probably: WPF style looks different on different Windows'. You develop and design something on Windows 7, but some old-fashion customer still have Windows XP or maybe already installed the brand new Windows 8.1 and everything falls apart. You can prevent it when you use your own style, custom controls and redefine every single style property. Well, it does not sound too friendly. But don't worry, there is another option.

Why is it different in the first place?


Although the .NET runtime framework has the same version, somehow it still looks different on different OSs due the default style on Windows XP is Luna, on Windows 7 is Aero (first introduced in Vista) and on Windows 8 / 8.1 is Aero2 (or Aero Glass). If you create a WPF application and don't change the theme, references or create custom styles then one of those themes will be applied respectively to the OS Version.
On one hand it is a little bit annoying, since one does not want to create a complete custom style for an intern-used-only application just to make sure progressbars and comoboxes as well as word wrapping  are the same. On the other hand it has to be this way to make sure OS design is consistent. So, whenever your application is gonna need the PresentationFramework.dll, the current OS will provide it's own default.

Solution


The solution is easier than you think. You don't need to customize any control or use 3rd party stuff. All you need is to tell your app to use e.g the Aero theme. First copy the Windows 7 Aero DLLs (PresentationCore.dll, PresentationFramework.dll, PresentationFramework.Aero.dll) to your solution folder from c:\Program Files (x86)\Reference Assemblies\Microsoft\Framework\.NETFramework\v4.0\ and then explicit reference them into your solution. After that, modify your App.xaml and include the theme as resource. Enjoy :)

<Application x:Class="WPFAeroDemo.App"
             xmlns="http://schemas.microsoft.com/winfx/2006/xaml/presentation"
             xmlns:x="http://schemas.microsoft.com/winfx/2006/xaml"
             StartupUri="MainWindow.xaml">
    <Application.Resources>
        <ResourceDictionary>
            <ResourceDictionary.MergedDictionaries>
                <ResourceDictionary Source="/PresentationFramework.Aero;component/themes/Aero.NormalColor.xaml"/>
            </ResourceDictionary.MergedDictionaries>
        </ResourceDictionary>
    </Application.Resources>
</Application>

Result

Without explicit theme definition
OS Default style on Windows XP (left), on Windows 7 (middle) and on Windows 8.1 (right)

With explicit definition
Aero style
Aero style on Windows XP (left), on Windows 7 (middle) and Windows 8.1 (right)

Thursday, December 5, 2013

How to change an assmebly in runtime

If you develop an application it often comes up "how to deliver patches?". In case of a client application it might be an easy way to check updates at start up like ClickOnce does or simply ask user to update and restart the client. But when it comes to a service it is a more difficult question. When can you stop the service? Can you stop it at all? When you stop it what is going to happen with the clients or with the arriving data? Of course there are some solutions like load balancing, hearth-beat systems, MAF, etc. The best would to replace the DLL, of course it is not possible, at least overwrite isn't. What you can do, put an other version of the file into the folder and let the application to discover it.

My tiny demo application writes "hello" on the console in every second. To make it modular and "replaceable" it is implemented in an other library, client accesses it's interface only. I use MEF to discover the actual implementations.

private DirectoryCatalog PluginCatalog { get; set; }

public Program()
{
   this.Compose(@".\debugger");
}

private void Compose(string path)
{
   this.PluginCatalog = new DirectoryCatalog(path);                           

   var catalog = new AggregateCatalog(
          new AssemblyCatalog(System.Reflection.Assembly.GetEntryAssembly()),
          new AssemblyCatalog(System.Reflection.Assembly.GetExecutingAssembly()),
          this.PluginCatalog);         
   

   var container = new CompositionContainer(catalog);
   container.ComposeParts(this);
}

public void Log(string msg)
{
}


static void Main(string[] args)
{
   var p = new Program();

   while (Console.KeyAvailable == false)
   {
      p.Log("HeLLo");
      Thread.Sleep(1000);
   }
}

It does (at least now) nothing, but creates a MEF container from assemblies in the ./debugger folder and calls the Log method in every second.
We need a logger interface, which has to be an other assembly, lets name it "Debugger.SDK". It only contains an interface (what a waste).

namespace MEF.DebuggerSDK
{
   using System.ComponentModel.Composition;

   [InheritedExport(typeof(IDebugger))]
   public interface IDebugger
   {
      void Log(string msg);
      int Version { get; }
   }
}

Don't forget to decorate with InheritedExport attribute, to allow MEF to find it. IDebugger interface exposes one method and one property. Log logs, but what is Version? We need to distinguish the implementations to know a newer version is available. Reference this DLL into the main app.

Now, we got an IDebugger, let's import it into our demo client.

[ImportMany(typeof(IDebugger), AllowRecomposition=true)]
private IEnumerable<IDebugger> Debugger { get; set; }

Like I said, we cannot overwrite or unload loaded DLL-s (unless they are loaded into a different app domain), so we need to prepare to might have more then one implementation of IDebugger. However we only need one at the time. Now we can implement the Log method. It checks whether any implementation of IDebugger is available and use one with the highest version number, otherwise use Console.WriteLine to show the message.

public void Log(string msg)
{
   if (this.Debugger.Any())
   {
      var debugger = this.Debugger.OrderByDescending(d => d.Version).First();
      debugger.Log(msg);
   }
   else
   {
      Console.WriteLine(msg);
   }
}

We are almost done. Somehow we need to detect new files into the debugger folder and recompose IDebugger import. To achieve, use FileSystemWatcher.

private void Watch()
{
   FileSystemWatcher watcher = new FileSystemWatcher(@".\debugger", "*.dll");
   watcher.Created += this.OnPluginFolderChanged;
   watcher.EnableRaisingEvents = true;                  
}

private void OnPluginFolderChanged(object sender, FileSystemEventArgs e)
{        
   this.PluginCatalog.Refresh();
   Console.WriteLine("Plugin folder changed, recompose...");
}

PluginCatalog was created once we composed the MEF container, all we have to do is refresh.

If you start the app, it's going to write "HeLLo" on the console until you press any key. To replace this logger style create a new project, include DebuggerSDK, implement IDebugger interface and copy the compiled file into the ./debugger folder. E.g:

namespace MEF.LowerDebugger
{
   using MEF.DebuggerSDK;

   public class LowerDebugger : IDebugger
   {
      public void Log(string msg)
      {
         Console.WriteLine("[lower] " + msg.ToLower());
      }

      public int Version
      {
         get
         {
            return 1;
         }
      }
   }
}

You don't need to export it extra, since interface has an InheritedExport attribute, which exports every inherited class under the type of the interface.
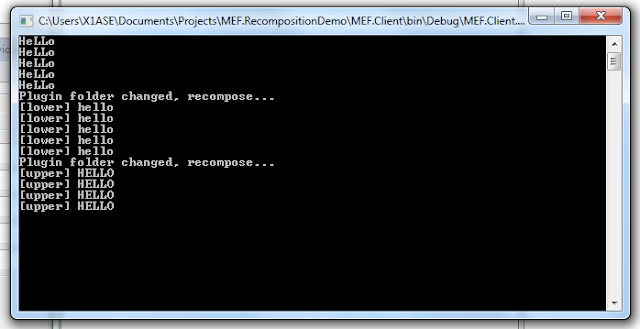
Runtime
Replace implementation in runtime

Please keep it mind, that this kind of implementation cannot be an official patch deliver method, since it has to load new DLL(s) which consume(s) more and more memory. It can be also security critical, due an inner functionality is simple replaceable.

Source code can be downloaded from here.


Monday, October 28, 2013

How to implement a login screen in WPF

I recently needed to implement an application with login screen and googled some best practice, but without luck. I've seen some solutions, but none of them could impress me. So, I decided to do it in my way and share with you.
First of all, my prerequisites were not to use two windows, because it looks lame when WPF closes one window and starts a new one. I also didn't want to use Popups or modal dialogs because they come after main window and they are part of the it. Furthermore main window (UserControl) will be loaded, initialized and rendered before you even see a login screen. If you don't put to much logic in your constructor it might be fast, but still unwanted at that moment. So, I think the best way is to use one Window with two UserControls.

Let's start with the contents, we need a LoginViewModel and a MainViewModel. Login will be shown first and if the credentials were accepted screen will be changed to main. Create a common interface, IFrameContent with an OnChangeRequest event handler member. Implement this interface as a FrameContent base class.

public abstract class FrameContent : ViewModelBase, IFrameContent
{
   public event EventHandler OnChangeRequested;
   
   protected void Deactivate()
   {
      if (this.CanDeactivated())
      {
         var handler = OnChangeRequested;
         if (handler != null)
         {
            handler(this, EventArgs.Empty);
         }
      }
   }

   public virtual bool CanDeactivated()
   {
      return true;
   }
}      

Not a big deal. ViewModelBase is a simple base class, which implement INotifyPropertyChanged. Okay, inherit this class and create our two screens: main and login.

public class LoginViewModel : FrameContent
{      
   public RelayCommand LoginCommand { get; private set; }

   public LoginViewModel()
   {
      this.LoginCommand = new RelayCommand(Login, (p) => true);
   }

   private void Login(object parameter)
   {
      this.Deactivate();
   }
}

MainViewModel is the same story. RelayCommand is an implemented ICommand interface. In the view bind the command to a button. What here happens is a command execution without any check. But don't worry, you can extend it later.

Finally create the FrameWindow, our only window and put everything together. Create two properties for our two view models and an extra for currently selected. Subscribe their events and in the handler change to the other content.

public class FrameWindowViewModel : ViewModelBase
{
   private LoginViewModel _Login;
   private LoginViewModel Login
   {
      get
      {
         if (this._Login == null)
         {
            this._Login = new LoginViewModel();
            this._Login.OnChangeRequested += Login_LoginSuccessful;
         }

         return this._Login;
      }
   }

   private MainViewModel _Main;
   private MainViewModel Main
   {
      get
      {
         if (this._Main == null)
         {
            this._Main = new MainViewModel();
            this._Main.OnChangeRequested += Main_OnChangeRequested;
         }

         return this._Main;
      }
   }

   private IFrameContent _currentContent;
   public IFrameContent CurrentContent
   {
      get
      {
         return this._currentContent;
      }
      private set
      {
         this._currentContent = value;
         this.RaisePropertyChanged("CurrentContent");
      }
   }

   public FrameWindowViewModel()
   {         
      this.ChangeContent(this.Login);
   }

   private void Main_OnChangeRequested(object sender, EventArgs e)
   {
      ChangeContent(this.Login);
   }

   private void Login_LoginSuccessful(object sender, EventArgs e)
   {
      ChangeContent(this.Main);     
   }

   private bool ChangeContent(IFrameContent content)
   {
     this.CurrentContent = content;

     return true;
   }
}

The trick is, that you need to bind the CurrentContent in the view as a ContentPrestener's content.

<Window x:Class="LoginDemoClient.Views.FrameWindow"
        xmlns="http://schemas.microsoft.com/winfx/2006/xaml/presentation"
        xmlns:x="http://schemas.microsoft.com/winfx/2006/xaml"
        Title="Demo client" Height="350" Width="525">

    <ContentPresenter Grid.Row="1" Content="{Binding CurrentContent}" />

</Window>

Override the CanDeactivated() method in content classes and build in some real check to prevent login in case of invalid credentials.

Of course you can (need to) extended bases classes with OnActivated(), OnDeactivated() etc methods in a real application, but the base concept does not change. You have one current content and change it in a frame window (SRP) without those two actually would known each other or without EventBus or EventAggregator (which are anti-pattern in my opinion).

You can download a full source code from here.

MDI implemention in WPF

I just recently noticed that, there is no MDI (Multiple Document Interface) support in WPF. Microsoft recommends to use TabControl or AvalonDock. However sometimes it could be really useful to see multiple documents in the same time, e.g: during data process. So I decided to develop a one. You can download MDIContainer from here. There is a sample application as well.

How to start
After you downloaded the binary (PDB is also attached), all you need to do is add MDIContainer.Control.dll as reference in your WPF Application. In order to use you need at least .NET 4. MDIContainer does not need any third party or additional references.

Hello MDI
You can decide to use direct content or bind ItemsSource to container. However direct content does not make too much sense. Why do you need closable windows if you have fixed content? So, let's stay by binding. 

<MDI:MDIContainer Margin="4" ItemsSource="{Binding Items}">
    <MDI:MDIContainer.Resources>
        <Style TargetType="{x:Type MDI:MDIWindow}">
            <Setter Property="Title" Value="{Binding Title}" />             
        </Style>
    </MDI:MDIContainer.Resources>
</MDI:MDIContainer>

As you can see, it is similar to the implementation of a TabControl. ItemsSource is also not magic, a simple ObservableCollection<IContent>. You don't have to use IContent interface if you don't want to, you can put there object or your class. It doesn't matter. I prefer to use interfaces in situations like this, to make it more flexible.

public ObservableCollection<IContent> Items { get; private set; }
 
public interface IContent
{
   string Title { get; }
}

There is only one thing left, a user control. Like I wrote, there is no limitation. Create a user control with a view model like you want. Here is a really sample one:

public class PersonWindow : ViewModelBase, IContent
{
  public string Title { get; private set; }

  public PersonWindow(string title)
  {
    this.Title = title;
  }
}

If you don't know how to implement ViewModelBase or what could it be, you can read more here. Currently you can leave it's view empty, but don't forget to set it as DataContext or DataTemplate.

Back to the main window's view model, where you defined the Items. Initialize the Items and add some content:

public MainWindowViewModel()
{
  this.Items = new ObservableCollection<IContent>();
  this.Items.Add(new PersonWindow("Window 1");
  this.Items.Add(new PersonWindow("Window 2");
  this.Items.Add(new PersonWindow("Window 3");
}

Of course this tiny little example does not make too much sense, but shows you how simple to use this control.

You can check it's CodePlex site and download a fully working demo with source code.